By pressing the ![]() button on the top of the screen, a new client can be created. The same dialog is displayed when editing existing clients from the clients list.
button on the top of the screen, a new client can be created. The same dialog is displayed when editing existing clients from the clients list.
The left hand side menu shows the available settings section. Settings are displayed according the selected section.
General
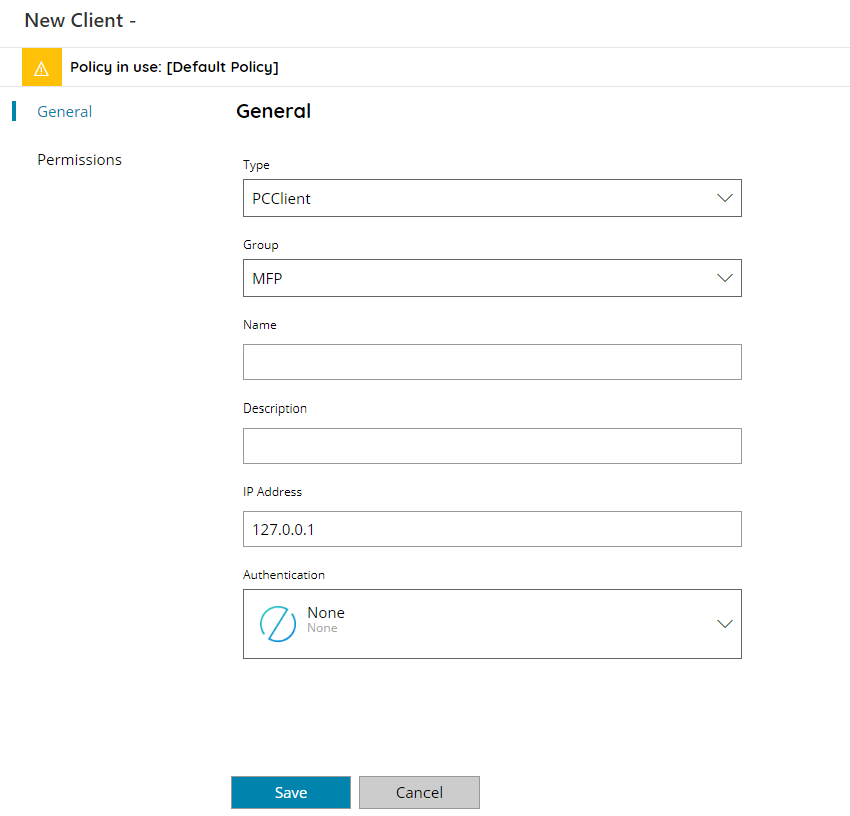
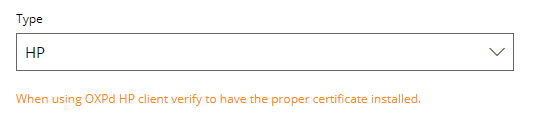
Type
Select the type of client to add.
Group
Select a group here where to insert the new created client.
Group name
Define a name for the new group the create. Displayed when in Group is selected the option + (only option in new installations). The new group will be created together with the new client.
Name
Enter name for your MFP here (e.g. office MFP), so you can recognize the MFP without having to check the settings.
Description
Enter a distinguish personal description for your client here (e.g. MFP for internal use ), the description is not shown anywhere.
IP Address
Enter the IP address of the client here. If the IP Address is already in use a warning will be displayed at the time settings are saved.
Push client (visible only for supported clients)
If enabled Scanshare will attempt to automatically push the embedded client to the device, where supported. If the push will fail the client will be saved as Disabled.
Automatic pushing of embedded clients is available for: Develop, HP (OXPd), Konica Minolta, Kyocera, OKI (EWB), Olivetti, Olivetti OpenAPI, Ricoh (SDK/J), Samsung, Toshiba (EWB), Xerox.

Authentication
Here you can enable or disable authentication on the new client. Available options are:
- None
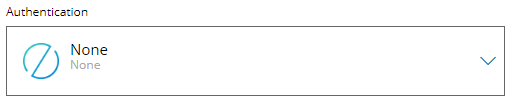
Client without authentication.
- Only scanning
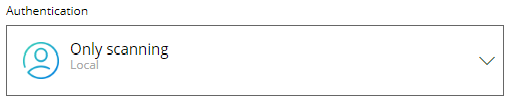
Client with scanning authentication. Authentication is displayed at the time of using the scanning client.
For embedded devices which are using device authentication this option will produce another login screen inside the Scanshare embedded client.
- Complete device

Client with full authentication and use of the Accounting functionalities. The option will enable device authentication for supported device. Client marked with this authentication setting will be working automatically with any feature of the Accounting module:
- Authentication
- Billing & Reporting
- Pull Print (Cloud and On-Premise)
On the top of this view there is a indicator dialog:

It indicates the name of the policy currently in use, so some operations and settings may be overwritten by those in use in the specific policy. The policy in use is given by the assignments inside the policy settings. Clicking on the policy name you can view and modify policy settings.
Settings
The settings section is per-client-type customized and displayed dynamically based on the selected client type. It contains specific settings for the selected client type. It might not appear for all client types.
Develop

Button name
Customize the default embedded client button name on the device panel. Leave empty for the default naming.
Machine password
Customize the default MFP administrator password.
Web client
Here you can select which client you want to install / use (if automatic installation is supported), webclient (ON) or embedded client (OFF).
Pull print
Here you can select if the pull print embedded client needs to be enabled as well for the current MFP. The option is visible only if Accountin is available in the current license. Pull print embedded client will be automatically pushed at the time of Saving settings or when using Push & Update.
Use device login
Instructs the embedded client if using silent and automatic installation by using the device logged in user (if any).
Authentication function version
Customize authentication OpenAPI function version if needed. Leave default for automatic selection: highest MFP supported version.
Pull Print function version
Customize Pull Print OpenAPI function version if needed. Leave default for automatic selection: highest MFP supported version.
Setup function version
Customize Setup OpenAPI function version if needed. Leave default for automatic selection: highest MFP supported version.
Scan function version
Customize Scan OpenAPI function version if needed. Leave default for automatic selection: highest MFP supported version.
FujiFilm
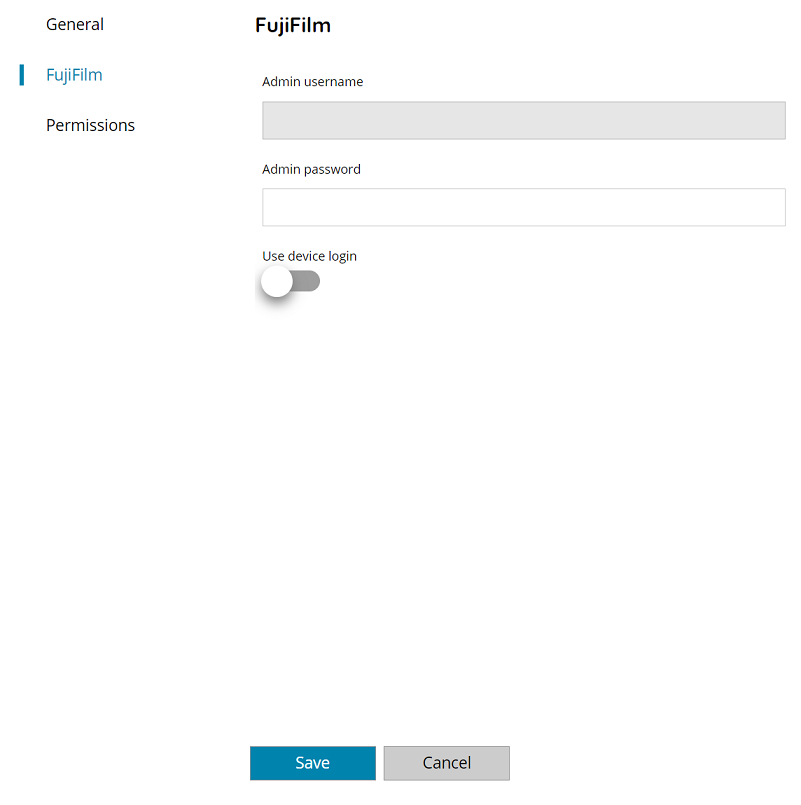
Admin username
Customize the default MFP administrator username.
Admin password
Customize the default MFP administrator password.
Use device login
Instructs the embedded client if using silent and automatic installation by using the device logged in user (if any).
HP
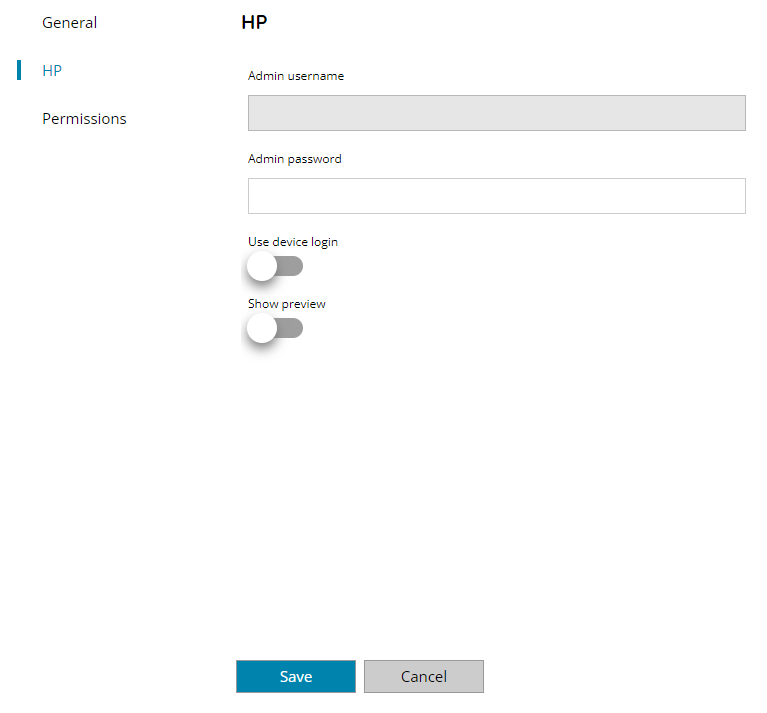
Admin username
Customize the default MFP administrator username.
Admin password
Customize the default MFP administrator password.
Use device login
Instructs the embedded client if using silent and automatic installation by using the device logged in user (if any).
Show preview
If enabled a preview of the scanned document will be displayed before sending it to the server.
Katun
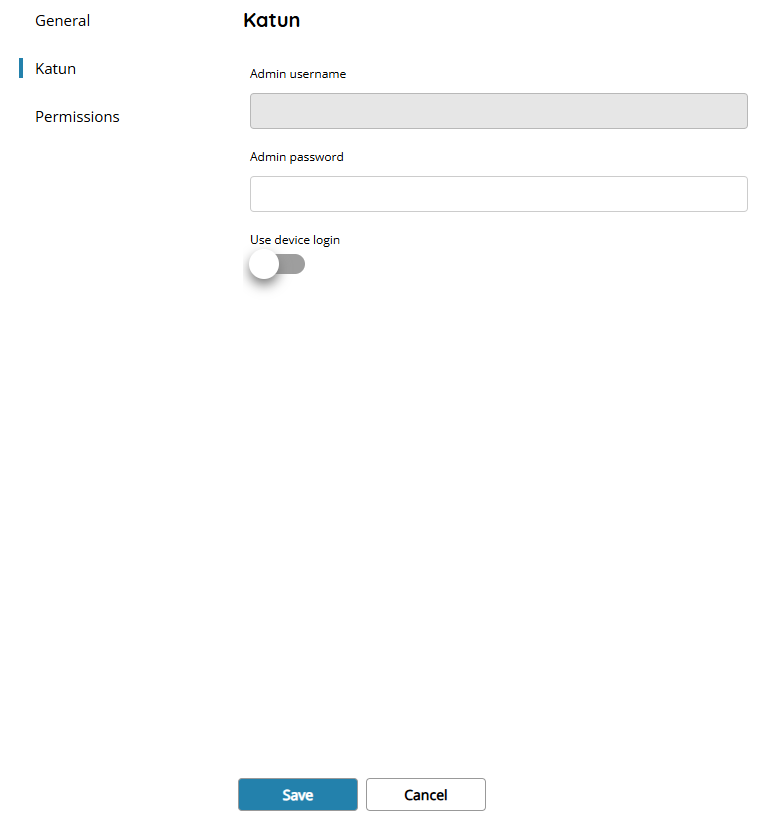
Admin username
Customize the default MFP administrator username.
Admin password
Customize the default MFP administrator password.
Use device login
Instructs the embedded client if using silent and automatic installation by using the device logged in user (if any).
Konica Minolta

Button name
Customize the default embedded client button name on the device panel. Leave empty for the default naming.
Machine password
Customize the default MFP administrator password.
Web client
Here you can select which client you want to install / use (if automatic installation is supported), webclient (ON) or embedded client (OFF).
Pull print
Here you can select if the pull print embedded client needs to be enabled as well for the current MFP. The option is visible only if Accountin is available in the current license. Pull print embedded client will be automatically pushed at the time of Saving settings or when using Push & Update.
Use device login
Instructs the embedded client if using silent and automatic installation by using the device logged in user (if any).
Authentication function version
Customize authentication OpenAPI function version if needed. Leave default for automatic selection: highest MFP supported version.
Pull Print function version
Customize Pull Print OpenAPI function version if needed. Leave default for automatic selection: highest MFP supported version.
Setup function version
Customize Setup OpenAPI function version if needed. Leave default for automatic selection: highest MFP supported version.
Scan function version
Customize Scan OpenAPI function version if needed. Leave default for automatic selection: highest MFP supported version.
Kyocera
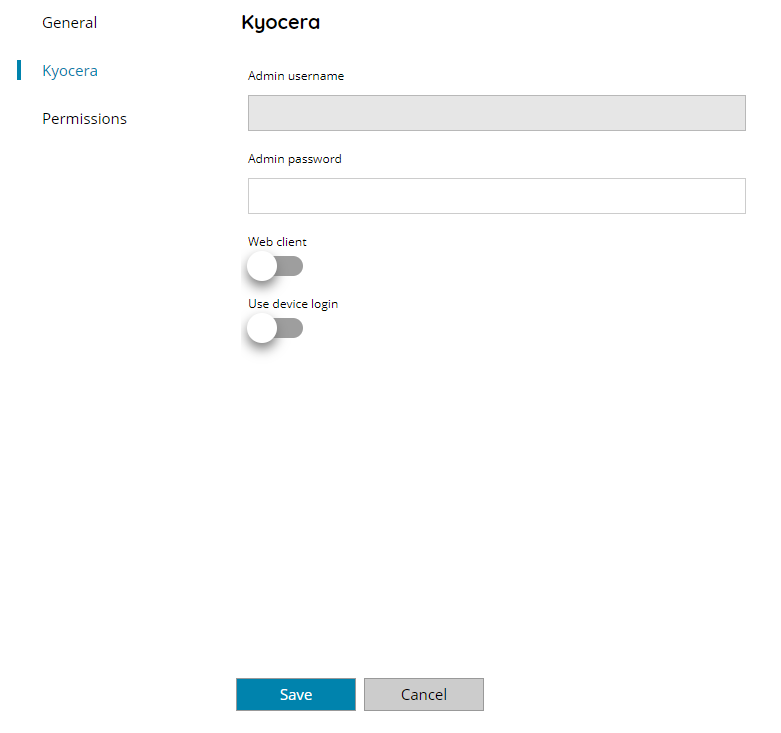
Admin username
Customize the default MFP administrator username.
Admin password
Customize the default MFP administrator password.
Web client
Here you can select which client you want to install / use (if automatic installation is supported), webclient (ON) or embedded client (OFF).
Use device login
Instructs the embedded client if using silent and automatic installation by using the device logged in user (if any).
OKI EWB
Machine username
Customize the default MFP administrator username.
Machine password
Customize the default MFP administrator password.
Use device login
Instructs the embedded client if using silent and automatic installation by using the device logged in user (if any).
Olivetti

Admin username
Customize the default MFP administrator username.
Admin password
Customize the default MFP administrator password.
Web client
Here you can select which client you want to install / use (if automatic installation is supported), webclient (ON) or embedded client (OFF).
Use device login
Instructs the embedded client if using silent and automatic installation by using the device logged in user (if any).
Olivetti OpenAPI

Button name
Customize the default embedded client button name on the device panel. Leave empty for the default naming.
Machine password
Customize the default MFP administrator password.
Web client
Here you can select which client you want to install / use (if automatic installation is supported), webclient (ON) or embedded client (OFF).
Pull print
Here you can select if the pull print embedded client needs to be enabled as well for the current MFP. The option is visible only if Accountin is available in the current license. Pull print embedded client will be automatically pushed at the time of Saving settings or when using Push & Update.
Use device login
Instructs the embedded client if using silent and automatic installation by using the device logged in user (if any).
Authentication function version
Customize authentication OpenAPI function version if needed. Leave default for automatic selection: highest MFP supported version.
Pull Print function version
Customize Pull Print OpenAPI function version if needed. Leave default for automatic selection: highest MFP supported version.
Setup function version
Customize Setup OpenAPI function version if needed. Leave default for automatic selection: highest MFP supported version.
Scan function version
Customize Scan OpenAPI function version if needed. Leave default for automatic selection: highest MFP supported version.
Ricoh
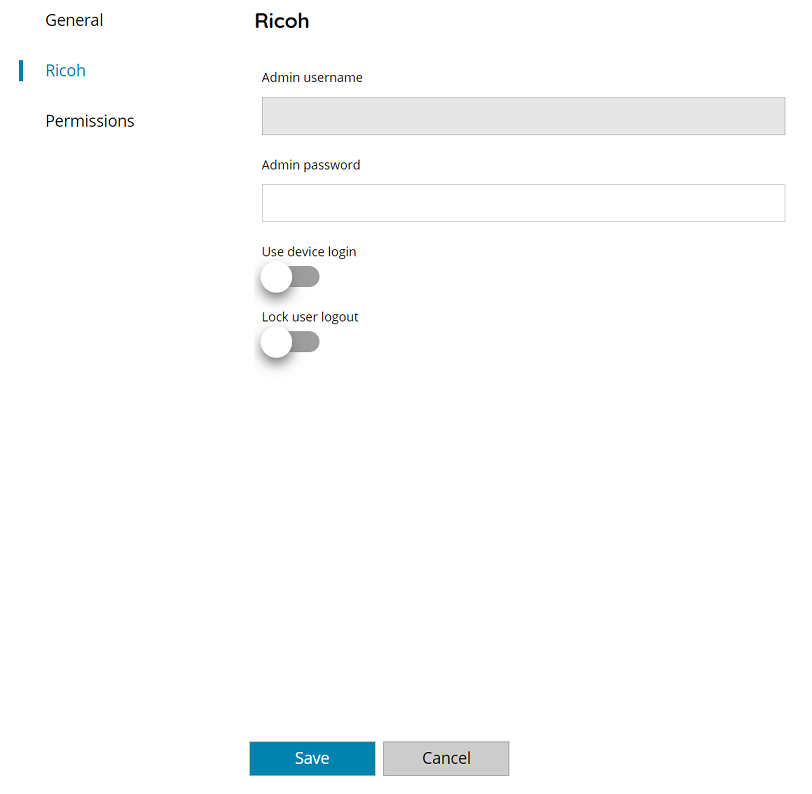
Admin username
Customize the default MFP administrator username.
Admin password
Customize the default MFP administrator password.
Use device login
Instructs the embedded client if using silent and automatic installation by using the device logged in user (if any).
Lock user logout
Instructs the embedded client to prevent user from logging out when authentication is in use. Logout button disappears from the client when the option is enabled.
Samsung
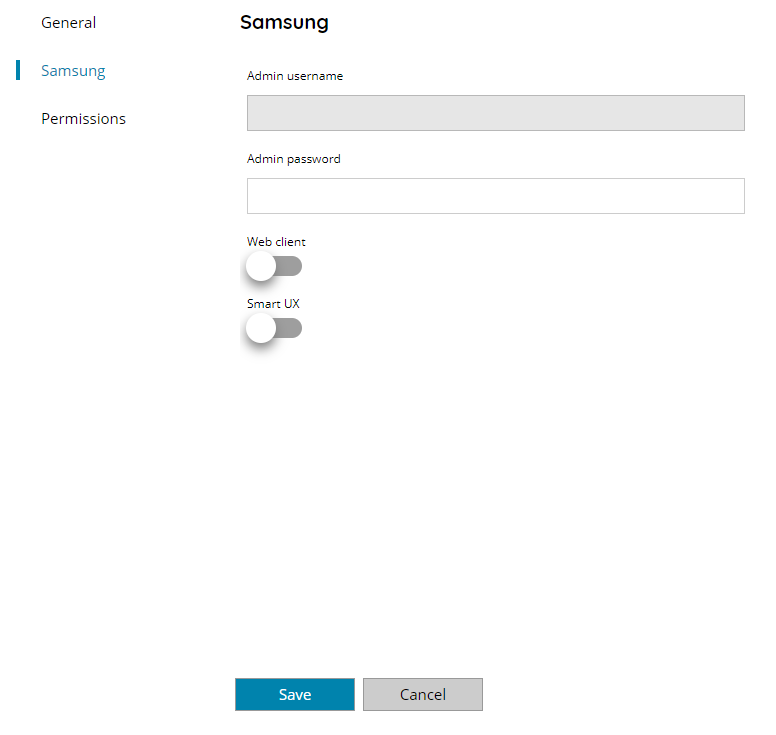
Admin username
Customize the default MFP administrator username.
Admin password
Customize the default MFP administrator password.
Web client
Here you can select which client you want to install / use (if automatic installation is supported), webclient (ON) or embedded client (OFF). The setting is exclusive with the Smart UX selection.
Smart UX
Here you can select if a Smart UX client version is used. The setting is exclusive with the Web Client selection.
Sharp
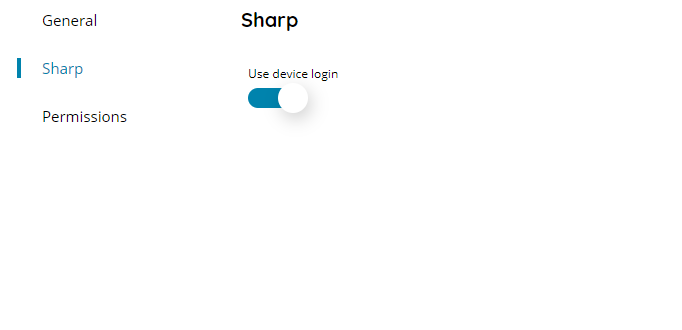
Use device login
Instructs the embedded client if using silent and automatic installation by using the device logged in user (if any).
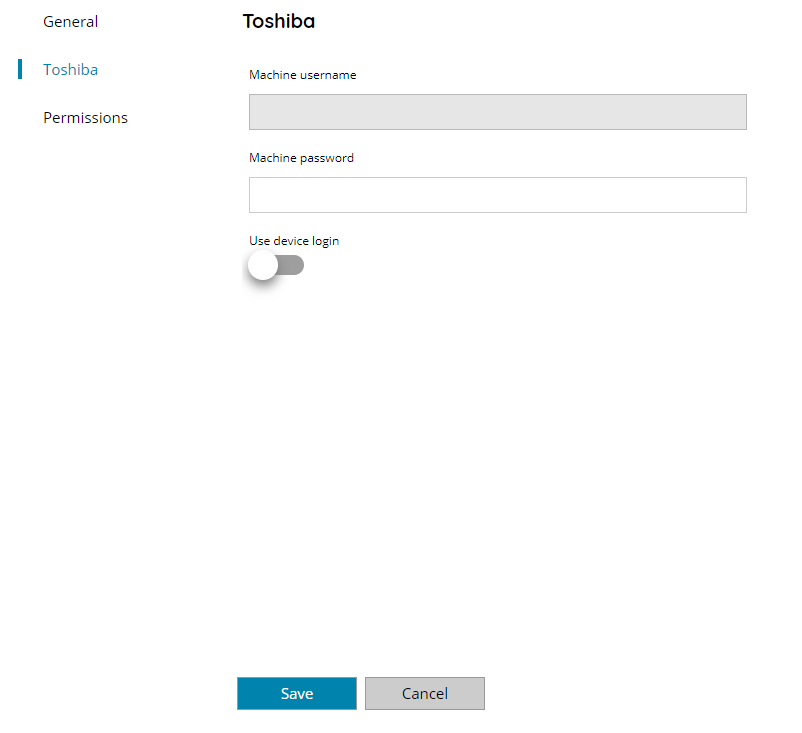
Toshiba

Machine username
Customize the default MFP administrator username.
Machine password
Customize the default MFP administrator password.
Use device login
Instructs the embedded client if using silent and automatic installation by using the device logged in user (if any).
Xerox
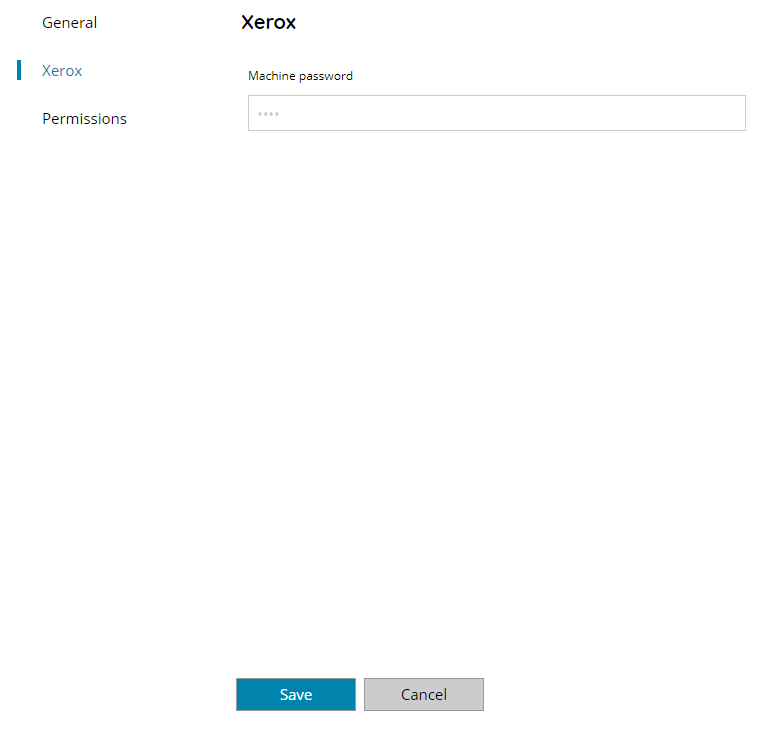
Machine password
Customize the default MFP administrator password.
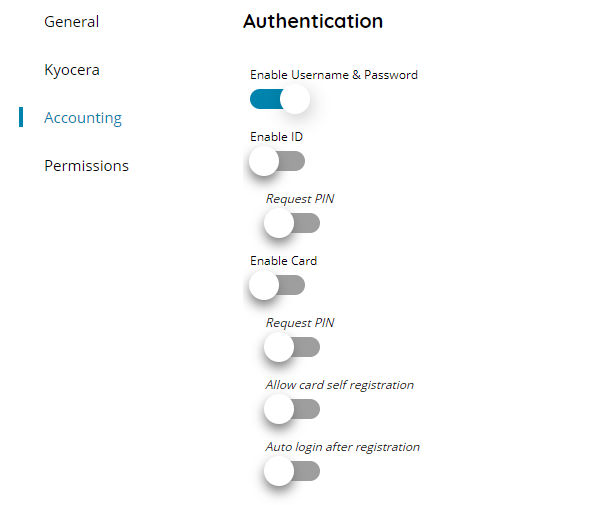
Accounting
The section contains specific accounting settings when Complete Device authentication type is in use. Accounting section is visible only for the client types which have support for the Accounting functionalities and when Complete Device authentication is selected.
Develop
Authentication

Enable Username & Password
If enabled the authentication application will display controls to enter username and password which will be validated as a general User authentication (Users and Single Sign On profiles).
Enable ID
If enabled the authentication application will render the username field as User ID field as well and login can be performed by entering manually the ID of the users. ID’s can be the assigned Card ID’s or manually numeric ID’s assigned to the users.
Request PIN (for User ID authentication)
If enabled the authentication application will require the PIN for validation when a valid User ID is provided, otherwise only the User ID will validate and authenticate the user. PIN’s can be assigned automatically via User Single On or manually via User settings.
Enabled Card
If enabled the authentication application will accept Cards to perform login, a Card logo is rendered on the screen to show that cards are accepted.
Cards are pre-registered and assigned to every user. Behavior of registration and unknown cards is given by the next settings below.
Allow card self registration (for Card authentication)
If enabled and a unknown card is badged on the card reader the authentication application will show an error message and request to login with a valid user account (full username and password) to self register the used card to that user account, if login successfully.
When disabled a unknown card will just not make any action and a login error might appear on certain devices.
Allow login after registration (for Card authentication)
If enabled it will auto login automatically after a new card is registered to a valid authenticated user. The option works in combination of Allow card self registration previous one otherwise it has no action.
When disabled and a new card is self registered the authentication application will return to the default login screen.
Function limitation

Allow copy
If enabled device copy function is allowed.
Allow print
If enabled printing function is allowed.
Allow print without authentication
If enabled guest (without authentication) printing function is allowed.
Allow scan
If enabled device scan function is allowed.
Allow fax
If enabled device fax function is allowed.
Allow box
If enabled device box function is allowed.
Allow print send
If enabled device print send function is allowed.
Allow scan to USB
If enabled device scanning to USB function is allowed.
Allow color print
If enabled color printing function is allowed.
Allow color send
If enabled device color sending function is allowed.
HP
Authentication
Enable Username & Password
Enable authentication by plain credentials username and password via standalone users or SSO profiles.
Enable ID
Enable authentication by User ID. ID’s are numeric custom assigned via Users settings or registered Card ID’s.
Request PIN
Request PIN in combination of the entered User ID. If OFF users can login by only entering their ID, if ON each user PIN is required to be entered as well.
Enable Card
Enable authentication by external card, if any card reader is installed on the device. Cards need to be registered for the first use so Allow card self registration is suggested.
Request PIN
Request PIN in combination of the detected card. If a valid card is detected the user PIN will be requested to validate the login process.
Allow card self registration
Enable possibility to register unknown cards directly at the login procedure. If OFF and a not valid card is detected a login failure message will be displayed. If ON and a not valid card is detected a login screen via user credentials is displayed in order to validate the user to which assign the card.
Allow login after registration
Enable direct login after an unknown card is successfully registered. If OFF the authentication application will be returning to the home login screen after the card registration. It works only in combination with Allow card self registration.
Function limitation
Allow copy
Allow copy functions after login.
Allow print
Allow print functions after login.
Allow scan
Allow scan functions after login.
Allow fax
Allow fax functions after login.
Allow box
Allow box functions after login.
Allow print send
Allow print send functions after login.
Allow scan to USB
Allow scanning to USB functions after login.
Allow color print
Allow color print functions after login.
Allow color send
Allow color send functions after login.
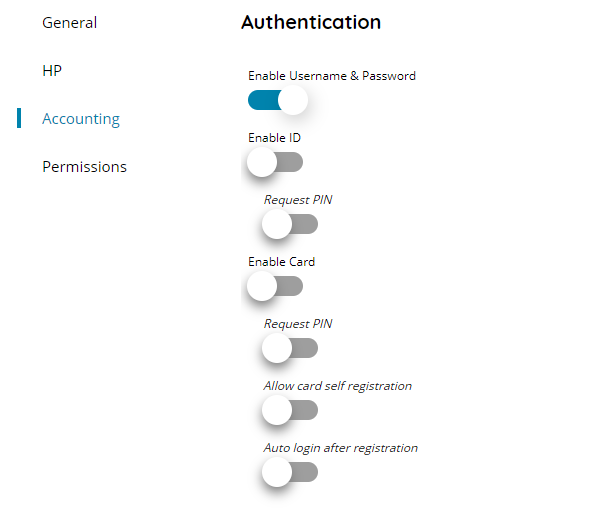
Konica Minolta
Authentication
Enable Username & Password
If enabled the authentication application will display controls to enter username and password which will be validated as a general User authentication (Users and Single Sign On profiles).
Enable ID
If enabled the authentication application will render the username field as User ID field as well and login can be performed by entering manually the ID of the users. ID’s can be the assigned Card ID’s or manually numeric ID’s assigned to the users.
Request PIN (for User ID authentication)
If enabled the authentication application will require the PIN for validation when a valid User ID is provided, otherwise only the User ID will validate and authenticate the user. PIN’s can be assigned automatically via User Single On or manually via User settings.
Enabled Card
If enabled the authentication application will accept Cards to perform login, a Card logo is rendered on the screen to show that cards are accepted.
Cards are pre-registered and assigned to every user. Behavior of registration and unknown cards is given by the next settings below.
Allow card self registration (for Card authentication)
If enabled and a unknown card is badged on the card reader the authentication application will show an error message and request to login with a valid user account (full username and password) to self register the used card to that user account, if login successfully.
When disabled a unknown card will just not make any action and a login error might appear on certain devices.
Allow login after registration (for Card authentication)
If enabled it will auto login automatically after a new card is registered to a valid authenticated user. The option works in combination of Allow card self registration previous one otherwise it has no action.
When disabled and a new card is self registered the authentication application will return to the default login screen.
Function limitation
Allow copy
If enabled device copy function is allowed.
Allow print
If enabled printing function is allowed.
Allow print without authentication
If enabled guest (without authentication) printing function is allowed.
Allow scan
If enabled device scan function is allowed.
Allow fax
If enabled device fax function is allowed.
Allow box
If enabled device box function is allowed.
Allow print send
If enabled device print send function is allowed.
Allow scan to USB
If enabled device scanning to USB function is allowed.
Allow color print
If enabled color printing function is allowed.
Allow color send
If enabled device color sending function is allowed.
Kyocera
Authentication
Enable Username & Password
If enabled the authentication application will display controls to enter username and password which will be validated as a general User authentication (Users and Single Sign On profiles).
Enable ID
If enabled the authentication application will render the username field as User ID field as well and login can be performed by entering manually the ID of the users. ID’s can be the assigned Card ID’s or manually numeric ID’s assigned to the users.
Request PIN (for User ID authentication)
If enabled the authentication application will require the PIN for validation when a valid User ID is provided, otherwise only the User ID will validate and authenticate the user. PIN’s can be assigned automatically via User Single On or manually via User settings.
Enabled Card
If enabled the authentication application will accept Cards to perform login, a Card logo is rendered on the screen to show that cards are accepted.
Cards are pre-registered and assigned to every user. Behavior of registration and unknown cards is given by the next settings below.
Allow card self registration (for Card authentication)
If enabled and a unknown card is badged on the card reader the authentication application will show an error message and request to login with a valid user account (full username and password) to self register the used card to that user account, if login successfully.
When disabled a unknown card will just not make any action and a login error might appear on certain devices.
Allow login after registration (for Card authentication)
If enabled it will auto login automatically after a new card is registered to a valid authenticated user. The option works in combination of Allow card self registration previous one otherwise it has no action.
When disabled and a new card is self registered the authentication application will return to the default login screen.
Function limitation
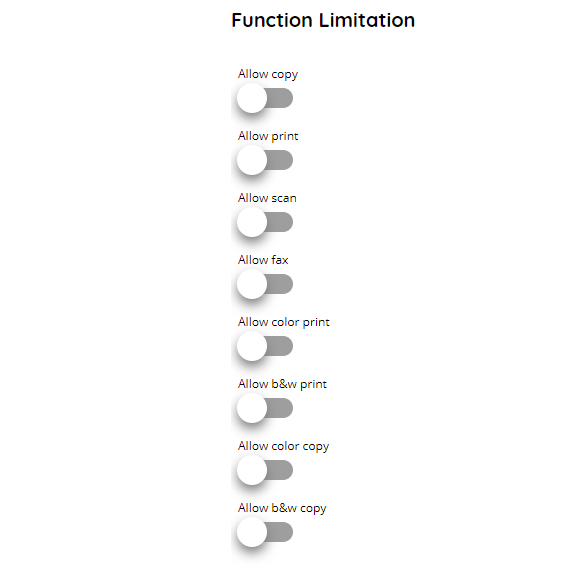
Allow copy
If enabled device copy function is allowed.
Allow print
If enabled printing function is allowed.
Allow scan
If enabled device scan function is allowed.
Allow fax
If enabled device fax function is allowed.
Allow color print
If enabled color printing function is allowed.
Allow b&w print
If enabled black and white printing function is allowed.
Allow color copy
If enabled color device copy function is allowed.
Allow b&w copy
If enabled black and white device copy function is allowed.
Olivetti
Authentication
Enable Username & Password
If enabled the authentication application will display controls to enter username and password which will be validated as a general User authentication (Users and Single Sign On profiles).
Enable ID
If enabled the authentication application will render the username field as User ID field as well and login can be performed by entering manually the ID of the users. ID’s can be the assigned Card ID’s or manually numeric ID’s assigned to the users.
Request PIN (for User ID authentication)
If enabled the authentication application will require the PIN for validation when a valid User ID is provided, otherwise only the User ID will validate and authenticate the user. PIN’s can be assigned automatically via User Single On or manually via User settings.
Enabled Card
If enabled the authentication application will accept Cards to perform login, a Card logo is rendered on the screen to show that cards are accepted.
Cards are pre-registered and assigned to every user. Behavior of registration and unknown cards is given by the next settings below.
Allow card self registration (for Card authentication)
If enabled and a unknown card is badged on the card reader the authentication application will show an error message and request to login with a valid user account (full username and password) to self register the used card to that user account, if login successfully.
When disabled a unknown card will just not make any action and a login error might appear on certain devices.
Allow login after registration (for Card authentication)
If enabled it will auto login automatically after a new card is registered to a valid authenticated user. The option works in combination of Allow card self registration previous one otherwise it has no action.
When disabled and a new card is self registered the authentication application will return to the default login screen.
Function limitation

Allow copy
If enabled device copy function is allowed.
Allow print
If enabled printing function is allowed.
Allow scan
If enabled device scan function is allowed.
Allow fax
If enabled device fax function is allowed.
Allow color print
If enabled color printing function is allowed.
Allow b&w print
If enabled black and white printing function is allowed.
Allow color copy
If enabled color device copy function is allowed.
Allow b&w copy
If enabled black and white device copy function is allowed.
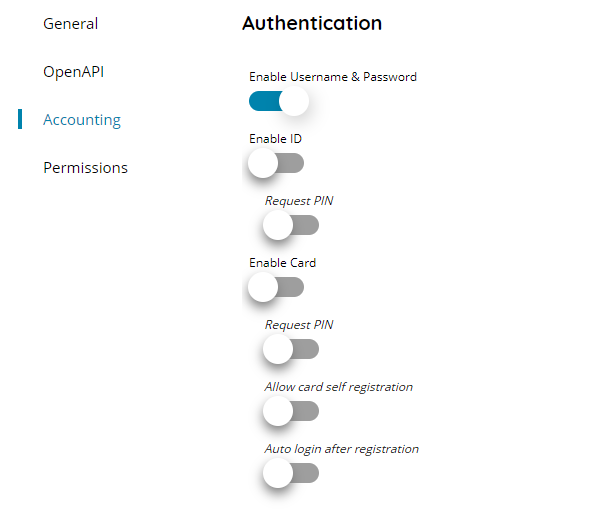
Olivetti OpenAPI
Authentication
Enable Username & Password
If enabled the authentication application will display controls to enter username and password which will be validated as a general User authentication (Users and Single Sign On profiles).
Enable ID
If enabled the authentication application will render the username field as User ID field as well and login can be performed by entering manually the ID of the users. ID’s can be the assigned Card ID’s or manually numeric ID’s assigned to the users.
Request PIN (for User ID authentication)
If enabled the authentication application will require the PIN for validation when a valid User ID is provided, otherwise only the User ID will validate and authenticate the user. PIN’s can be assigned automatically via User Single On or manually via User settings.
Enabled Card
If enabled the authentication application will accept Cards to perform login, a Card logo is rendered on the screen to show that cards are accepted.
Cards are pre-registered and assigned to every user. Behavior of registration and unknown cards is given by the next settings below.
Allow card self registration (for Card authentication)
If enabled and a unknown card is badged on the card reader the authentication application will show an error message and request to login with a valid user account (full username and password) to self register the used card to that user account, if login successfully.
When disabled a unknown card will just not make any action and a login error might appear on certain devices.
Allow login after registration (for Card authentication)
If enabled it will auto login automatically after a new card is registered to a valid authenticated user. The option works in combination of Allow card self registration previous one otherwise it has no action.
When disabled and a new card is self registered the authentication application will return to the default login screen.
Function limitation
Allow copy
If enabled device copy function is allowed.
Allow print
If enabled printing function is allowed.
Allow print without authentication
If enabled guest (without authentication) printing function is allowed.
Allow scan
If enabled device scan function is allowed.
Allow fax
If enabled device fax function is allowed.
Allow box
If enabled device box function is allowed.
Allow print send
If enabled device print send function is allowed.
Allow scan to USB
If enabled device scanning to USB function is allowed.
Allow color print
If enabled color printing function is allowed.
Allow color send
If enabled device color sending function is allowed.
Toshiba
Authentication
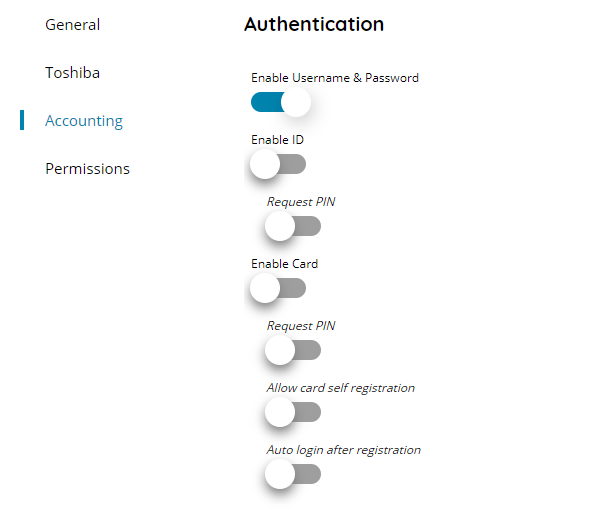
Enable Username & Password
If enabled the authentication application will display controls to enter username and password which will be validated as a general User authentication (Users and Single Sign On profiles).
Enable ID
If enabled the authentication application will render the username field as User ID field as well and login can be performed by entering manually the ID of the users. ID’s can be the assigned Card ID’s or manually numeric ID’s assigned to the users.
Request PIN (for User ID authentication)
If enabled the authentication application will require the PIN for validation when a valid User ID is provided, otherwise only the User ID will validate and authenticate the user. PIN’s can be assigned automatically via User Single On or manually via User settings.
Enabled Card
If enabled the authentication application will accept Cards to perform login, a Card logo is rendered on the screen to show that cards are accepted.
Cards are pre-registered and assigned to every user. Behavior of registration and unknown cards is given by the next settings below.
Allow card self registration (for Card authentication)
If enabled and a unknown card is badged on the card reader the authentication application will show an error message and request to login with a valid user account (full username and password) to self register the used card to that user account, if login successfully.
When disabled a unknown card will just not make any action and a login error might appear on certain devices.
Allow login after registration (for Card authentication)
If enabled it will auto login automatically after a new card is registered to a valid authenticated user. The option works in combination of Allow card self registration previous one otherwise it has no action.
When disabled and a new card is self registered the authentication application will return to the default login screen.
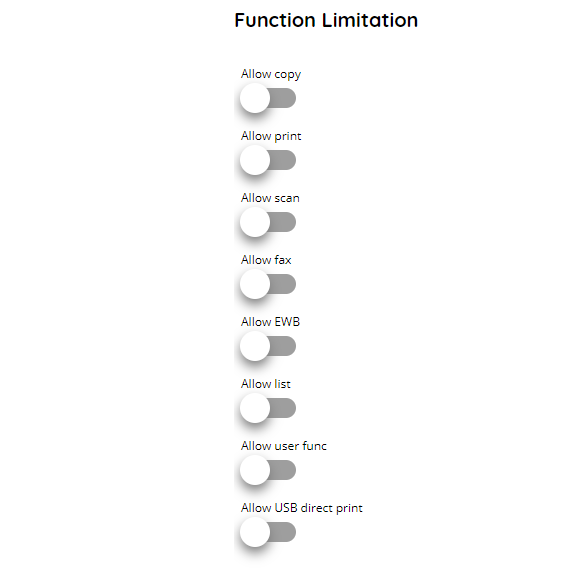
Function limitation
Allow copy
If enabled device copy function is allowed.
Allow print
If enabled printing function is allowed.
Allow scan
If enabled device scan function is allowed.
Allow fax
If enabled device fax function is allowed.
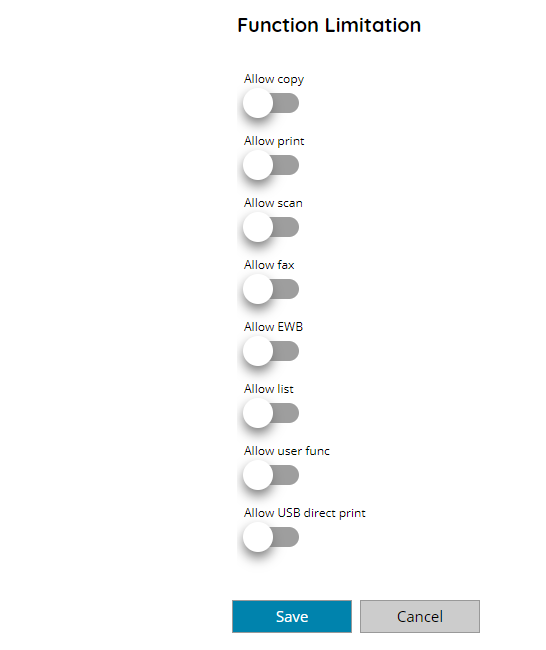
Allow EWB
If enabled device EWB function is allowed.
Allow list
If enabled device list function is allowed.
Allow user func
If enabled device user function is allowed.
Allow USB direct print
If enabled USB direct printing function is allowed.
Permissions
Here it is possible to set workflows permissions per client. By pressing the + Add button on the top of the modify client screen, you can add workflows to the permissions list. Default permissions are always ALL which means all new created workflows with a capture source of the target client type are visible.
By adding workflows to the permissions list only the selected workflows will be visible for the target client.
If any group permissions are in use they will override the client permissions. A warning will be visible in such cases.