By pressing the ![]() button on the top of the screen, a new workflow can be created by using the Scanshare Workflow Designer. The same designer is displayed when editing workflows from the list.
button on the top of the screen, a new workflow can be created by using the Scanshare Workflow Designer. The same designer is displayed when editing workflows from the list.
The left part of the screen displays the list of available and usable modules while the center part is the designer vectorial drawing area when they can be dropped and processing lines and connections can be created.
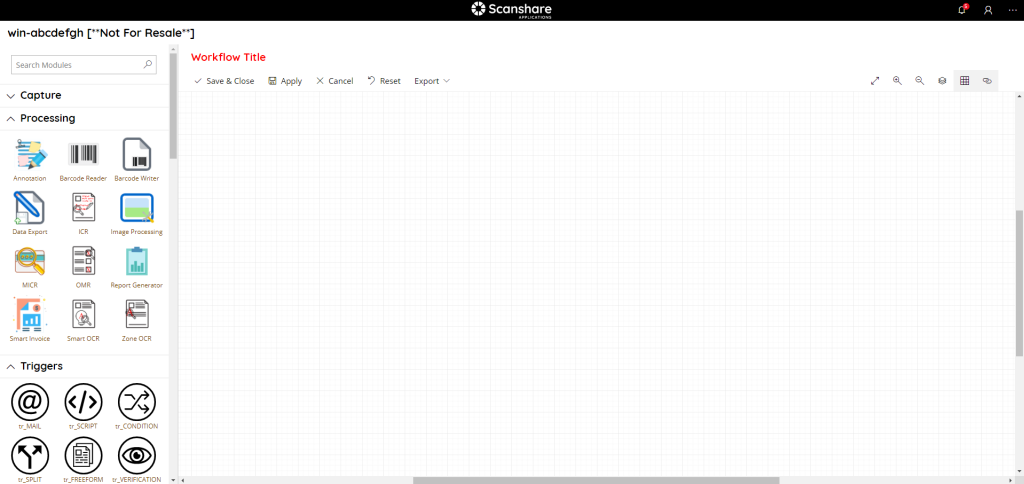
The left modules list is divided into 4 sections according the type of modules available:
- Capture
- Processing
- Triggers
- Store (Connectors)
Capture modules are required to be always the first modules dropped in a new workflow, no other modules are allowed to be used if no capture modules is used while Processing, Triggers and Connectors can be used anywhere, anytime.
Some capture modules can be used only once and they disappear from the modules when used, some others can be re-used multiple times as multiple sources, hence they won’t disappear.
When saving the workflow also the exact position of modules and connections is saved, the workflow will re-appear in the same look and file as when saved.
Modules can be dragged and dropped directly into the designer area or added with a double click, a search field is available on top of the left modules section to filter the desired module. Enter any keyword matching any module name, case insensitive, and hit Enter to filter the matching modules on top of the list.
Capture modules are always connected at the beginning of the workflow next to the existing capture modules, if any.
On top of the designer view there are general controls.
• Save & Close
It saves the current workflow and close it by returning the workflows list, and reloading it with the new / modified workflow.
• Apply
It saves any pending changes in the current workflow, the window stays open on the workflow designer with the current workflow.
• Cancel
It cancels any pending changes and workflow changes by returning to the workflows list.
• Reset
It resets the designer area by clearing all modules and processing lines configured.
• Export
Shows workflow export controls:
- XML: export the current workflow to a local XML file which can be imported by the Workflows list import / export
- Image: export the current workflow graphical representation, as seen inside the designer in a whole 100% zoom level, to a local SVG vectorial graphic file
For new workflows XML export is disabled until the workflow is first saved once.
Always on top of the designer view on the right hand side we can find general designer controls:
• Fit
Fit the whole workflow inside the current designer window size.
• Zoom In
Zoom in the workflow designer canvas.
• Zoom Out
Zoom out the workflow designer canvas.
• Auto Arrange modules
Automatically re-arrange all modules in a linear flow chart way:
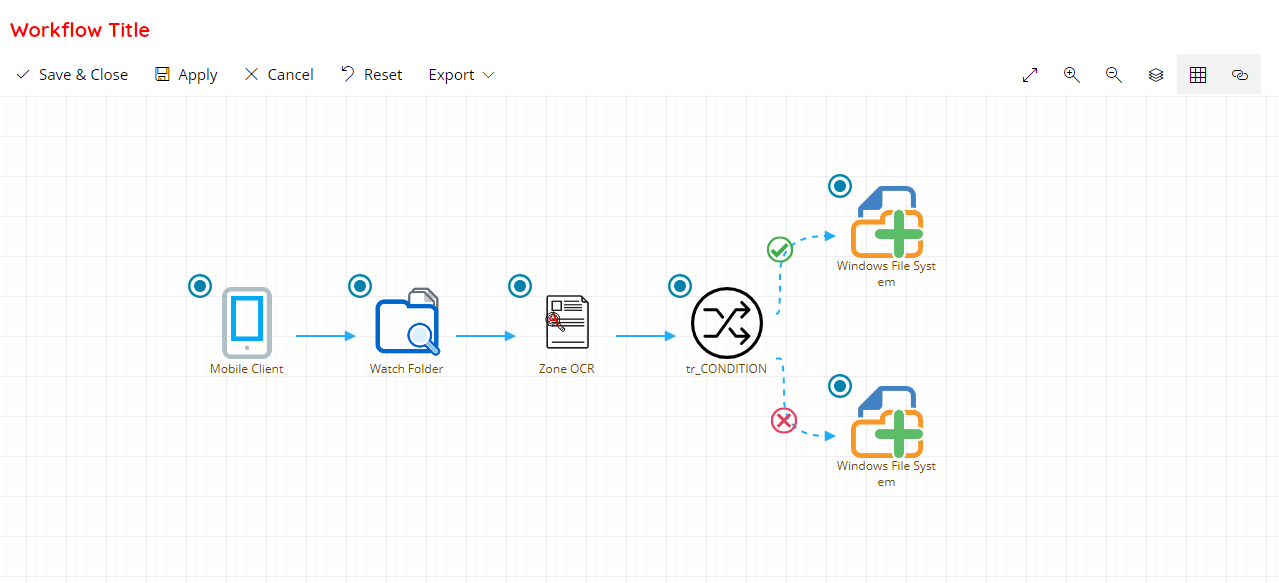
• Show/Hide Designer Grid
Show or Hide the designer grid.
• Autolink modules
If enabled every new module added into the designer area will be automatically linked to the previous added modules, otherwise no lines are drawn.
For every module in the designer area a controls area is displayed when overing the module:
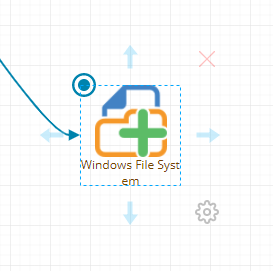
The circle button on top left allows to enable or disable the current module. A disabled module will be displayed grayed out and it will be completely skipped during the processing passing to the next module(s) on its connection line(s).
The red cross on top right allows to delete the module from the workflow. When deleting a module its connections will be deleted as well, make sure to reconnect the previous module(s) with the following one(s) according the desired logical processing path.
The gear button on bottom right allows to open the configuration dialog of the current module. Check the specific module section for details about the specific configuration.
The arrows on the 4 sides of the module allow to draw manually a connection to another module. There are no limitations on the number of connections which can be drawn except for the conditional triggers which might allow a maximum number of connections.
Some module controls have got special key combination actions, available ones are:
- SHIFT + Arrow: draw a connection directly to the next module in line (in the arrow direction) in the designer area, if no modules are “visible” an error on connection will be generated
- CTRL + Arrow: insert a copy of the current module next to it in the arrow direction (settings are not copied, just the module)
When multiple connections are starting from a specific module the document, as it appears at the current node, will follow simultaneous, in order, the multiple connections. Conditional connections are displayed as dotted lines with a true or false icon on them. Double click on the conditional icons will swap their meaning. Connections can be deleted by selecting the target connection and hit the DEL key on the keyboard.
The designer is performing sanity and logical checks for connections which are impossible to be drawn such as backward connections or connections from processing modules to capture modules.
All modules can be renamed with customized distinguish names to identify some key words about the specific node role. To enter a custom text double click on the module name text and enter the custom text. The custom text will be saved in the workflow settings.
Module name is wrapped on multiple lines to keep the module aspect ratio, avoid too long text which falls on too many lines and avoid usage of special characters which may generate workflow saving errors.
If a Workflow is configured with unlicensed modules they will be appear as grayed out (disabled) and with the lock icon on overlay which gives the hint tooltip that the module isn’t available in the current license.
Unlicensed modules will be skipping also during the processing logging a warning about the reason, hence Workflow is fully functional.
Unlicensed modules Workflow can appear mainly when changing license type on existing installations or when importing workflows created on a different installation which might have a different license hence workflows created with different modules.